Proudly serving Phoenix, Scottsdale, Glendale, Peoria, Paradise Valley, Tempe & surrounding areasCall or Text 24/7: 480-264-8603
Guides

What to Check Before Installing a New Ceiling Fan

Phoenix Electrician Co. installs and replaces ceiling fans across Phoenix every week, where the right box, bracing, wiring, blade clearance, and mounting height determine whether a fan runs safely and without wobble. Before buying a fan, confirm the room dimensions, ceiling height, electrical box rating, joist access, and control setup.

Quick Summary

  • Use a UL 514A fan-rated box and follow NEC 250.110 and 314.27 for a fan over 35 pounds or installed with a downrod.
  • Keep blades 8 to 9 feet above the floor, never below the 7-foot minimum, and at least 18 to 24 inches from walls or other obstructions.
  • Match span to room size: 42 to 44 inches suits rooms up to about 175 square feet, while great rooms and larger living areas generally need 52 inches or more.
  • Turn power off at the breaker and test the box; a straightforward replacement takes about 1 to 2 hours, while new wiring can take 3 to 5 hours and may require a Phoenix permit.

Three Checks Before Installation

Fan-Rated Ceiling Support

The electrical box must be stamped for fan support and tied directly to a joist or a brace bar spanning two joists. Fan-rated boxes typically support 35 to 70 pounds; fans over 50 pounds or with chandelier-style light kits may need extra blocking or a support strap, and 56-inch commercial-grade units add more vibration and torque.

Room Fit and Blade Clearance

Measure blade span, ceiling height, and nearby walls before buying. Phoenix rooms with 8- to 9-foot ceilings commonly use a 3- to 6-inch downrod, while vaulted ceilings may need 12 inches or more to place the blades in the proper airflow zone.

Power-Off Wiring Check

Switch off the breaker, not only the wall control, and verify the box with a non-contact voltage tester. Separate fan and light controls need a 3-wire connection rather than the 2-wire setup in an older single-function circuit; an older 15-amp breaker should also be checked for capacity and heat damage.

What to Inspect Before Installation

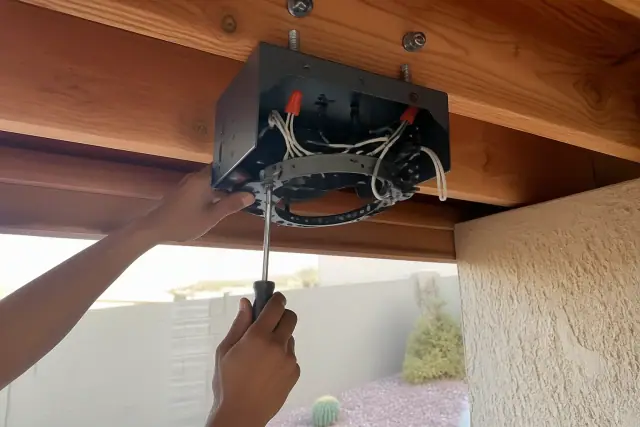
Fan-Rated Box Secured to a Ceiling Joist

Technician installing a fan-rated electrical box on a ceiling joist at a job site in Phoenix, AZ.

The fan-support stamp, mounting screws, and framing connection should all be visible before the canopy goes up. These details distinguish a supported fan from a standard light box hidden behind the canopy.

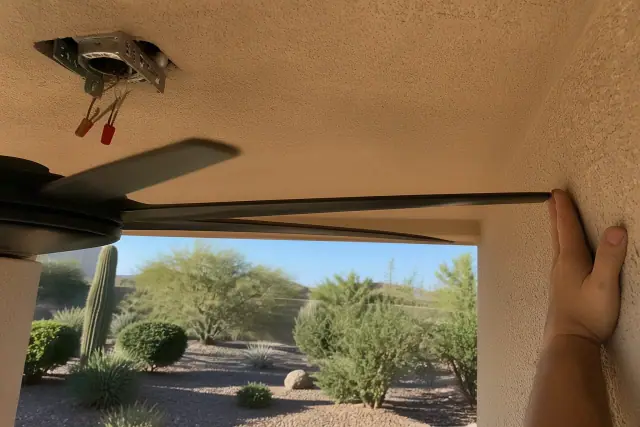
Correct Blade Span and Wall Clearance

Technician installing a ceiling fan bracket and wiring near a wall in a Phoenix, AZ home.

Room width, blade sweep, ceiling height, and nearby walls must be measured together. Those dimensions reveal an undersized fan, crowded blade tips, or a downrod that places the fan too high or low.

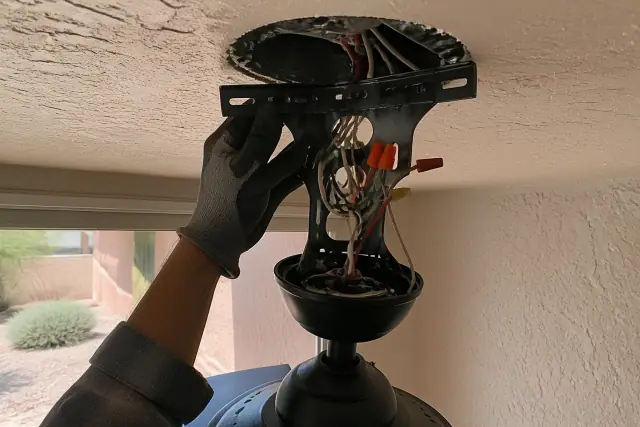
Dual-Control Ceiling Fan Wiring Layout

Technician installing a dual-control ceiling fan wiring layout in a home in Phoenix, AZ.

A dual-control layout includes black, white, and ground connections plus separate control conductors for the fan motor and light kit. That arrangement differs from the wiring for a single switched light.

Ceiling Fan Planning Snapshot

Check the Ceiling Structure First

Locate framing with a ceiling-rated stud finder and confirm it with a small pilot hole before cutting. Joists in Phoenix slab-on-grade homes often run 16 or 24 inches on center, but additions may be irregular, so check the bay for plumbing and attic-run HVAC ductwork too.

Plan Downrod and Blade Clearance

Keep the blade's lowest point at least 7 feet above the floor and aim for an 8- to 9-foot mounting zone for airflow. Allow 18 to 24 inches from blade tips to walls or obstructions, and use a fan-rated angled bracket on a sloped ceiling.

Allow Time for Added Electrical Work

An attic brace can add 20 to 30 minutes but helps prevent sag and wobble from appearing six months later. A straightforward fixture swap often takes 1 to 2 hours, while a new box, new wiring, or difficult access in a two-story home can extend the work to 3 to 5 hours.

Stop for Electrical Warning Signs

Do not continue if you find sparking, a scorched box, an energized housing, or a breaker that will not reset. Some central Phoenix homes built before the 1980s may also have aluminum branch circuits or cloth-insulated wiring that needs a connector suited to the conductor rather than a standard wire nut.

Installation Planning Matrix

Starting ConditionWork to ConfirmTypical Time in the Draft
Existing fan-rated box and compatible wiringVerify breaker-off status, grounding, bracket fit, and blade clearance.About 1 to 2 hours
Box or bracing needs an upgradeInstall joist-mounted support; heavier fans may need blocking or a support strap.A brace can add 20 to 30 minutes
No existing wiring or a new circuit is neededRun cable, install a fan-rated box, and confirm Phoenix permit and inspection requirements.Typically 3 to 5 hours

Why Planning Comes First

Phoenix summers regularly push past 110 degrees, so a correctly sized fan can improve comfort and let you raise the thermostat a few degrees. That benefit still depends on safe support and wiring: even a 25-pound fan creates a dynamic load, and skipping the initial evaluation is a common reason DIY installations loosen or hum within the first year.

Factors That Change the Installation

Existing wiring, fan weight, ceiling slope, a light kit, a remote receiver, and the control arrangement all affect scope. Costs and timing rise when the work includes a new switch leg, panel changes, a vaulted ceiling, or 12-foot-plus attic access; new wiring or a new circuit may also require a permit and inspection through the City of Phoenix Development Services Department.

Common Follow-Up Questions

Can an existing light box stay? Only when it is clearly rated for the fan's weight and dynamic load. Does a Phoenix replacement need a permit? A swap on existing wiring generally does not, but a new circuit, switch leg, or panel alteration does. How can you tell the installation is right? The bracket should sit flush, blades should stay level, and the fan should run without wobble, humming, flicker, or intermittent remote response; a loose connection, unbalanced blade, or failing capacitor may take only a five-minute repair once correctly diagnosed.
Plan a Safe Installation

Need Help Planning Your Installation?

Share the room dimensions, ceiling height, fan weight, light-kit or remote details, and whether wiring already exists. Those details help an electrician confirm the likely box, bracing, control wiring, permit needs, and estimate scope before work starts.